A muffler or a complete exhaust system will be one of the single-most expensive items the average GS/GSX punter will buy for their motorcycle.
The prices can be frightening. Original exhaust systems in presentable condition are as rare as hens' teeth, and command suitably crippling prices on eBay. After-market systems can also be amazingly expensive. Wreckers, being opportunistic sorts like any business people, know that they have us over a barrel, so they're often not that much cheaper.
In my case, the old GS1000S came with a rattier-than-usual exhaust system. It had to go!
So I searched high and low, at local wreckers and on eBay, but there was just no way I was going to fork out the somewhat rude amounts of money being asked. This put me between "a rock and a hard place", as the saying goes. But then, of course, another saying applied: "Necessity is the mother of invention".
Yes, the time had come to make my own muffler from scratch. At first I had no idea how to go about it, but the more I visualised and schemed and wondered, the more achievable it appeared. Then as I shared my ideas with helpful neighbours, family members, and friends, and they all chimed-in with their wisdom and advice, it all started to look very achievable indeed.
[But before you go too much further, please read The Unfortunate But Necessary Disclaimer.]
How it all came together...
I decided that I would keep the 4-into-1 headers that were already on the bike. After all, they allow good access to the drain plug and the oil filter, and they skirt the centre-stand neatly enough. But the muffler itself called for A PLAN...
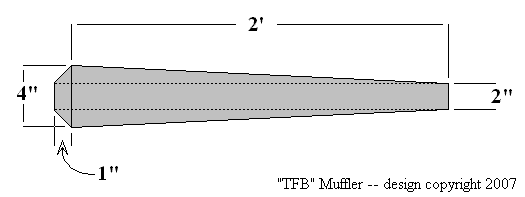
... which was to re-create something that resembled the original GS mufflers, with that classic long 'cone' shape. So I hunted around on eBay and elsewhere on the Internet, trying to find out what the dimensions of the cone-shape should be. It turned out that the classic shape I was after, was basically a 'truncated cone' going from a diameter of 2" to a diameter of 4" over a length of 2'.
Pondering a bit more, and looking at the original GS mufflers, I decided that a more pronounced 'reverse cone' on the end of the muffler would add a bit of style: hints of those classic Norton Commando 850 mufflers, perhaps. The final plan I came up with was:
I figured that if I began with a length of 2" diameter exhaust piping, then I could simply weld my two truncated cones to the outside. So it was off down to the local exhaust shop for a 1 metre length of 2" exhaust pipe. Cost: AU$15. Now I was committed: material had been bought, and my Inner Scrooge will never allow a project to languish! (He doesn't mind spending money... but it's wasted money that he cannot abide.)
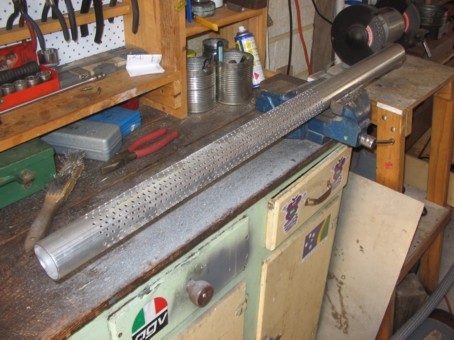
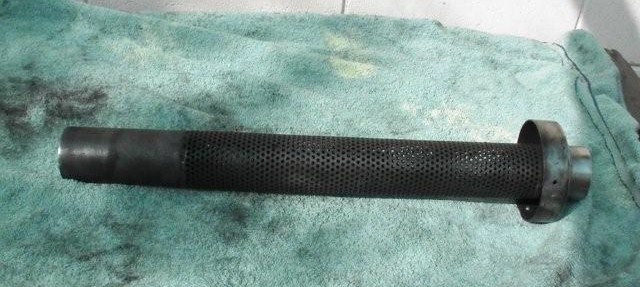
Now for the muffler to absorb sound effectively, it was going to need a lot of small holes drilled in the centre pipe. Yes, I could have bought a piece of ready-perforated stuff from the exhaust shop, but I wanted to keep costs down. Besides, I much rather doing whatever I can myself.
So, using the drill press and a few hours of patience, and as neatly as I could, I drilled lots of rows of 5mm holes at 10mm spacing (centre-to-centre) down the length of the pipe, in what would become the inside pipe of the muffler. In the end, I think I drilled something like 1100 holes. A new record for monotony had been achieved; my only slip was not having the chaps from The Guiness Book Of Records along to witness the attempt.
The next major issue was figuring out how to bend metal sheet into a cone shape — neatly. Andrew, my mate who helps run a large metal fabrication business, told me that the best way to do this in a home workshop, would be to make up a wooden 'mandrel' — a kind of wooden template of the shape you wanted the steel sheet to take — and then use it as a guide to bend the metal around. So I called up my brother-in-law Neil and asked him to turn me up a wooden cone on his wood-turning lathe... 2' long, going from 2" diameter to 4". Neil did this for me no sweat, and delivered it wrapped in Christmas paper on Christmas Day. The man definitely has a sense of occasion!

Then it was off to my local metal outlet for a sheet of steel. I didn't want to use something as thin as tin, but I didn't want it to be too thick and heavy either. It also had to be reasonably easy to bend. So I ended up going for a sheet of 1mm plain steel. I got a 900x1200mm sheet, enough to make three mufflers — because if I didn't get it right on the first attempt, I hoped I would have it down pat by the third!
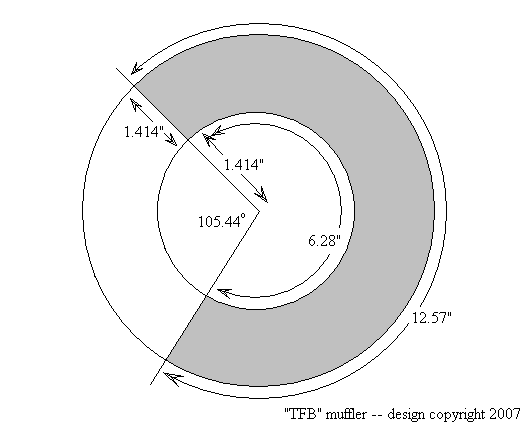
Then I had to dust off some High School mathematics in order to draw the flat shapes required for the two truncated cones that were going to make up the outer surface of the muffler. This sounds a bit complicated, but it's actually not too difficult. [If you want different sized cones to the ones specified on this webpage, just hop onto Google and search for 'truncated cone formula', and you'll be able to figure it out for yourself.] Anyway, here's the shape for the long cone (diagram not to scale):
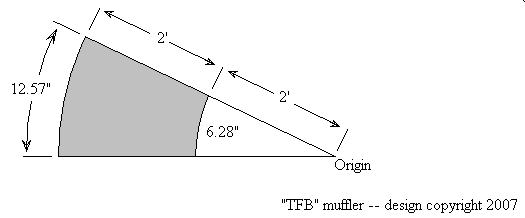
The area I wanted is shaded grey. The lengths of the short and long arcs were figured out using the formula '2Πr'.
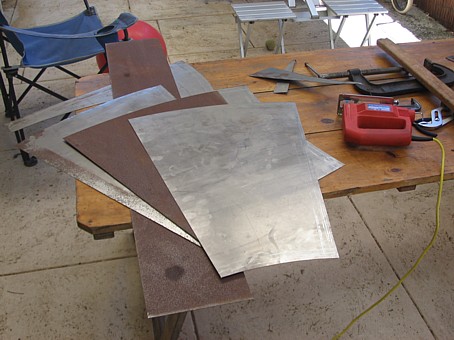
So it was just a matter of scribing this shape out on the metal sheet, and cutting it out with the jigsaw — equipped with a metal-cutting blade of course. This is actually a very neat way of cutting metal; just take your time and it works a treat.
It was at this point that my neighbour Ashley over the road came into the equation. The man has a very well equipped workshop indeed, and sitting there in his palatial workshop is... (drum roll)... a set of metal-bending rollers. So we were able to work the pre-cut sheet through the rollers, back and forth, until it was mostly bent to shape. Then we put it around the wooden mandrel, and used a series of large hose-clips to pull it tightly into shape around the mandrel.
Then it was simply a matter of Ashley firing up his TIG welder, and zipping it up down the length of the cone. Then he welded it on to the central pipe (the one with the 1100 holes I had so patiently drilled) at the narrow end of the cone.
After this I wandered over the street to another neighbour, Mark, who had a bag full of old fibreglass insulation batts. We managed to stuff nearly an entire insulation batt into the muffler body, ramming it down tight with a metal rod.
Then it was back over to Ashley's, where he welded the short 'reverse' cone onto the end of the muffler. This is, of course, another truncated cone, and it follows the same basic forumla. Here's how it's defined (diagram not to scale):
The 'reverse' cone was small enough to carefully bend into shape with my bare fingers.
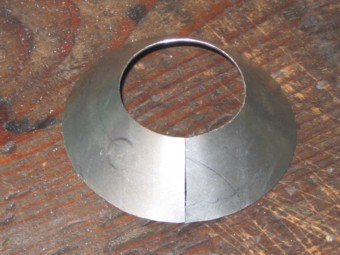
Then we welded a mounting bracket onto the outside of the muffler, to make use of the old mounting point on the subframe of the GS1000. This was followed by some sanding to finish off the welded joints on the muffler exterior. Finally, a coat of matt black hi-temp. exhaust paint out of a spray can was applied, to match the rest of the exhaust system. The final result:


So how does it sound? Well, the really surprising thing is how quiet it is for a straight-through muffler! Yet underneath it all there is a deep-ish note that gives it some respectability, too. All in all, I'm absolutely rapt with the result, especially given that this is a first effort.
One of the key factors in it turning out so well, I think, is the fairly simple design. Essentially it's three pieces of steel — and provided you have the welding skills (or know someone who does) it's all quite do-able. And while Ashley's metal-bending machinery was a great help, I think that enough patience with the mandrel and the hose-clips would have yielded a good result too.
And the total cost? OK, in Australian dollars...
- $0 for the wooden mandrel — thanks Neil
- $30 for the sheet steel (a 900x1200mm sheet, enough to make 3 mufflers!)
- $15 for the length of 2" diameter exhaust pipe
- $10 for a short piece of exhaust pipe with a bend in it (which I needed to route the muffler into the existing exhaust system)
- $0 for the fibreglass wadding (roof insulation) — thanks Mark
- $0 for the welding — thanks Ashley
- $0 for scores of other tips and suggestions — thanks Andrew
- $20 for the can of hi-temp spray-paint
- $2 to make a threaded plug from an 18mm nut & bolt (to accommodate the O2 sensor for when I'm doing diagnostics with my AFR meter)
So there you go, less than $80.
*** Of course, you're most welcome to use my plans and ideas here, to make your own muffler(s) if you want to. All I ask is that if you do make a muffler using this design and information, that you email me a photo of the finished item! I'll then add it to this page as testimony to your skill (or otherwise). 
Update: 11 March 2007 — OK, here's the latest on the muffler. So far I've done about 1000kms (600 miles) with it. And it's been going really well, except there is a hairline crack running around the end of the muffler, where the shorter 'end cone' meets the 2" central exhaust pipe at the exit. At first I thought it was just a dodgy weld. But today I noticed that when the muffler is hot, the pipe protrudes about 0.5mm, and when it's cold it goes inside the end of the cone about 0.5mm. In other words, the cracking is caused by the central pipe expanding at a greater rate than the external muffler sleeve. Which is logical when you think about it, because the inside of the muffler gets much hotter than the outside. Hmm... that means that the first design improvement on future mufflers I make, will be an internal expansion joint.
A few things to note...
- Now this muffler is, I think, fairly free-breathing. On my GS1000S, I have had to slightly richen the pilot mixture. You may need to do the same, or make other sorts of adjustments. It is your responsibility entirely to get the jetting right.
- How long will this muffler last? I have no idea. If longevity is something you want to ensure, make it out of stainless steel.
- Will this muffler meet the sound emission regulations in your part of the world? I have no idea whatsoever. But in my opinion (and that's all it is), it's a fairly quiet muffler.
* * * * *
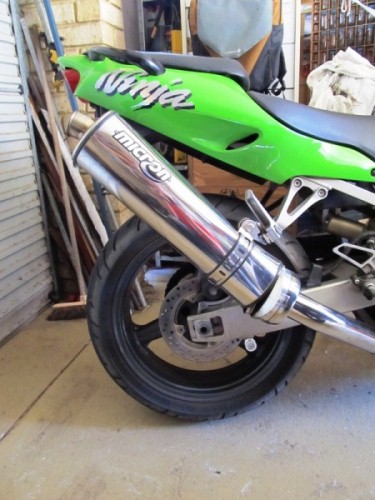
Fixing a muffler
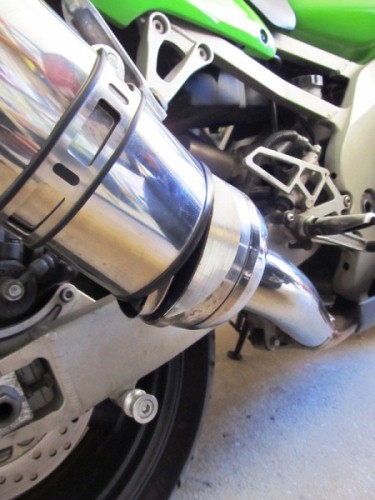
One sunny morning (26 Oct. 2012, to be exact) I was minding my own business aboard the ZX9, taking the half hour trip to work. I was just doing a left-hand turn into a T-intersection when BANG I copped an almighty wallop from behind which sent me scooting out into the intersection. WHAT THE... !!! *Thankfully* there was no traffic coming up the road. I managed to keep the Kawasaki upright, stopped, and looked behind me to see a shocked driver sitting in a Ford Mondeo. "Pull over NOW!" I yelled through my visor, pointing to the roadside. Herr Shuntmeister pulled over and I dirt-biked the ZX through the sand and on to the bicycle path. "What was THAT all about?!" He was very apologetic, admitted he had been too busy looking to the right as he took off, and had just bashed into the ZX's rear tyre. Well, at least he admitted fault.
The only damage was the ZX's muffler, as well as a bit of a bent number plate. The latter I can live with, but the former was stuffed:
The good news was that his insurance crew came to the party. The bad news? One of our girls' pet cats got bitten by a snake, and cost us a few hundred in vet's bills — effectively cancelling out the muffler money... :-/
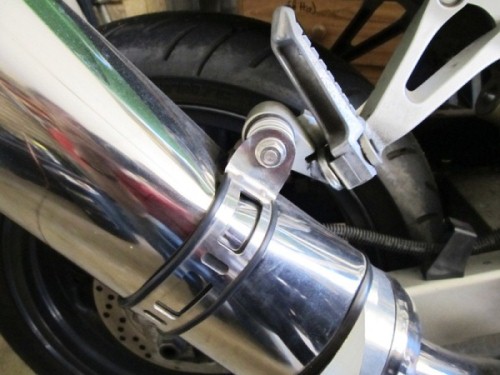
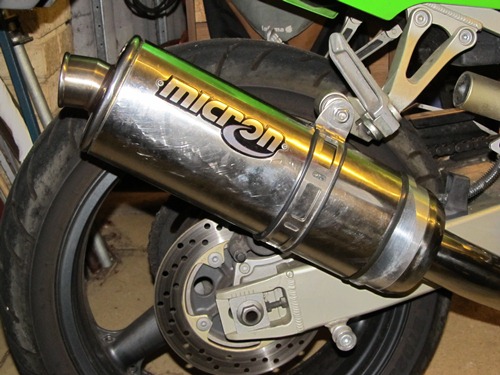
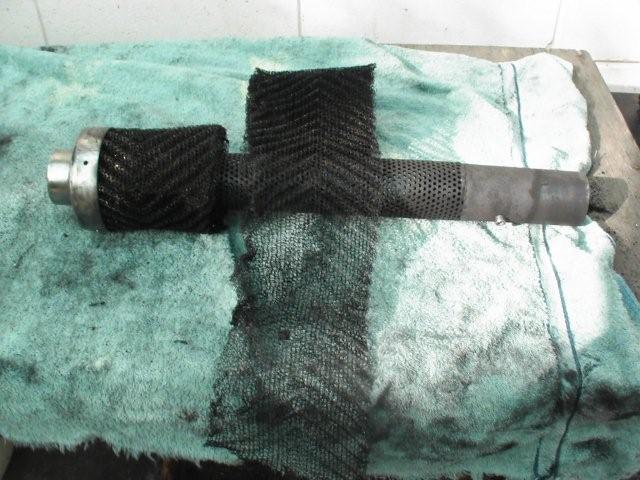
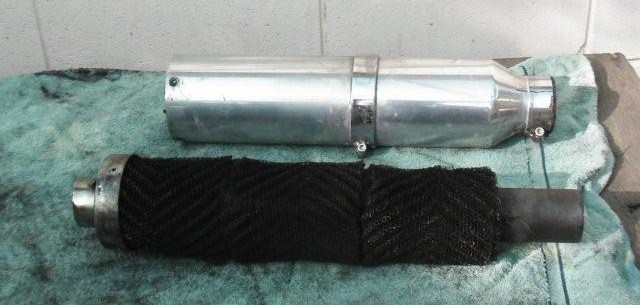
What to do? Well, try and fix the stuffed muffler, that's what. I took to it with the usual arsenal of tools. After figuring out how to get it apart, I then trimmed about 6" from the outer titanium sleeve to remove the bent part. Then I straightened the bent innards with the help of the blowtorch and a small array of hammers. Next was shortening the inner perforated lining by cutting and re-welding, then repacked it with fibreglass insulation batts (gotta love those things) as the old packing was just too loose and hairy. Final move was to coax it all back together with the rubber seals, etc.. This has resulted in a shorter (and louder, ahem) item:
What to do? Well, try and fix the stuffed muffler, that's what. I took to it with the usual arsenal of tools. After figuring out how to get it apart, I then trimmed about 6" from the outer titanium sleeve to remove the bent part. Then I straightened the bent innards with the help of the blowtorch and a small array of hammers. Next was shortening the inner perforated lining by cutting and re-welding, then repacked it with fibreglass insulation batts (gotta love those things) as the old packing was just too loose and hairy. Final move was to coax it all back together with the rubber seals, etc.. This has resulted in a shorter (and louder, ahem) item:
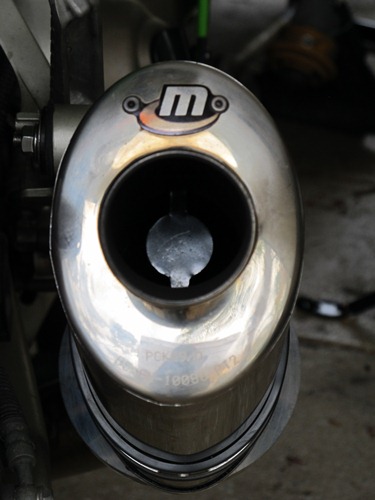
However, the downside was that a lot of the low-end tractability had disappeared. Hmm... likely cause of this was less back-pressure, I thought. So then I welded a 1" metal disc into the centre of the exhaust flow, towards the end of the muffler, in an effort to increase the back-pressure:
This seems to have done the trick; it's much less temperamental giving it throttle from low RPM. The note at full throttle is still a bit on the beserk side, but that might grow on me yet. If not, I might experiment a bit more and replace the titanium can with carbon-fibre, as this reportedly deepens the exhaust note considerably.
As a finishing touch, I am seriously considering fabricating a cat-skin muffler cover. The cat's cake-hole should stretch neatly around the exhaust output...
As a finishing touch, I am seriously considering fabricating a cat-skin muffler cover. The cat's cake-hole should stretch neatly around the exhaust output...
* * * * *
Darryl's muffler exploits
Hi Mike,
Just thought I'd send a couple pics of the exhaust I modified for my Katana to be a straight-through system. The exhaust is a 'Formula One' system, which, as it had no expansion allowance, repeatedly broke inside between the baffle and reducers. I ended up rolling some s/s perforated 1.6mm plate into a 2" cylinder, and welded it directly to the outlet flange. As this 2" internal straight-through pipe is unrestrained at the front end, it is allowed to expand separately, as well as fitting snugly inside the connection exhaust piece — while the outer aluminium can fits on the outside, which centralises everything.
I managed to track down some aluminium mesh which can be rolled in three sections to form the silencer material, instead of the dreaded fibreglass. This gives it an awesome throaty note and should last virtually forever.
Like you mentioned, I had to adjust the pilot screw for the straight-through exhaust, and I am still trying to fine tune the RS 34mm (ex 1985 GSXR 750 flatside) carbs.
The flatslides give an awesome horsepower boost. I might throw it on a dyno one of these days to see how many ponies she makes. I've only just got the motor back together as it did a big-end bearing on #1 cylinder, just after I rebuilt the top end (bummer!), and luckily I managed to track down another just-rebuilt crank for a few hundred bucks.
Next project is to fit up some RS38 flatslides to see if they are beneficial, as my motor is only mildly worked. It has a 1166 Arias kit, milled head and GSX1150 EFE cams, but apart from that is pretty much a stock 1000cc Katana motor.
The other exhaust mod I am looking at is shortening the tail can by 1/3 to only have 2 rolls of mesh inside, which will give it a neater look, and hopefully a better note. I have also made up a small removable s/s reducer to reduce the diameter 50mm inside-diameter of the exhaust by 10mm to 40mm diameter, to provide a bit of back pressure.
Cheers,
Darryl.
It's good experimentation and thinking like Darryl's that helps the rest of us save mega-bucks and come up with better-than-standard solutions into the bargain. 
* * * * *
Dave's muffler magic
G'day Mike,
I'm Dave, and I stumbled across your muffler build page, and it's just what everyone should try — the prices of crappy systems and good ones are just ridiculous! I've used straight-through or "car type" mufflers on bikes, and the power is equal to any high performance thing you can buy; it seems that the great muffler myth is "if it looks the part, it must be"? So my oval straight-through 'Walker' brand car-type muffler on my honda CB500 four was deemed crap — untill it was heard and seen how well the bike went! $48 bucks well spent.
Further to your building a muffler, I also have done a similar thing, although i was given an empty 'Tranzac' megaphone. Again it was for a Honda from the early 70s — this time a 550 four — but I needed to make a decent baffle. I bought the already-perforated pipe though; not cheap @ $60 bucks per meter. So I bought half a meter, and at work we have a plasma cutter and a MIG. I found a drive pulley from an old truck water pump, and ground off the vee-belt drive ring. Then I used a new bed spring begged from a mattress factory to keep pressure on the assembled baffle.


Great work Dave, I love the way you've found ordinary bits & pieces lying around, and used them to make a great looking system for the old Honda. Hopefully your efforts will inspire more of us to got the DIY-route, and so we can save the dosh for things we can't make ourselves!
* * * * *
The Unfortunate But Necessary Disclaimer:
All of the information here is for you to weigh up and use AT YOUR OWN RISK. While I have taken great care to ensure that the information on this page is accurate, YOU are the one who must judge whether the information in this article is correct and applicable to your machine and circumstances.
Furthermore, I am not a mechanic or engineer. I have no related qualifications and I am not endorsing, recommending or advising in any way. I strongly recommend that anything on this webpage be discussed with your local mechanic before any action is taken to implement the content of this webpage. So there.
Not only that, but YOU ALONE are responsible for any injuries you may sustain in attempting the procedures described on this webpage. You will note that cutting yourself with the jigsaw, or burning yourself with the welder, or even burning down the shed and the house, and all other such stunts, are not mentioned in the procedure. So do not do them, and do not blame me if it all goes pear-shaped.
Oh for a world without wretched disclaimers.
[Back to top]
* * * * *
