Here's the first dyno chart I've had done (back in March 2004), to check the fuel mixture was OK. Unfortunately the clutch let go a bit past 6000rpm, so I've since had to fix that (new friction plates, springs). Also, after this initial session I put richer main jets in the carbs (now 120, up from 107.5 standard). I'm planning on going back some time for a follow-up run, to see to what extent the lean fuel mixture has been rectified at higher rpm. Also to find out top hp at redline (should be somewhere over 100hp). Err, and also for the insane fun of seeing the bike going beserk on the dyno. 

Now 95HP @ 6400rpm is fairly respectable. Especially as this was done on rotten jetting, and before the top-end rebuild, too. I wonder what the old girl will pull at redline on a properly tuned motor? The curiosity is almost too much...
* * * * *
Dec. 2005
Well I've never quite gotten around to going back for another dyno run. But my latest idea is to hook up an oxygen sensor to the exhaust manifold underneath the bike, and wire that to a digital AFR (air-fuel ratio) meter. Why would I want to do that? To do my own diagnostics, of course.
Because all I'm really after in a dyno run, is making sure that the engine's not running too lean or rich across the rev-range. Now there's no denying that watching your bike go mental on a dyno is an absolute blast and very addictive, but at the end of the day finding out peak horsepower on an engine that easily has the ability to scare me witless anyway, isn't really a priority...
So I figured that for the price of a single dyno run, I could get my mits on the hardware needed to check the air-fuel ratio myself while riding the bike in 'real world' conditions. So, will it work? I reckon it will — but watch this space.
Update: May 5 2006
I've just obtained a digital AFR meter from DSE (picture below). It displays the AFR as both a bar-graph and a digital reading. And it only cost about AU$63 but that's because it comes in a kit that you assemble yourself. Thankfully the instruction manual was crystal clear, so that even a bloke like me who barely knows a diode from a transistor managed to get it all soldered and wired together with only a couple of hiccups. The worst bit was trying to figure out the difference between all the resistors by reading the colour bar codes printed on them. It was such a pain that in the end I just checked the resistance of each one with the digital multimeter, and that took the guesswork out.

Unfortunately the 2nd-hand oxygen sensor I bought a while back off eBay turned out to be as dead as a doornail... :-( ...so I've got a new item on order. Then all I need to do is weld a threaded collar to the side of the exhaust system, hook up the three wires (red & black for power from the battery, and yellow for input from the O2 sensor), tape the unit to the tank, and we're off for some real-world diagnostics.
So how does an O2 sensor work, and what are the principles behind these interesting bits of hardware? A good run-down can be found at Pico Technology.
Update: May 29 2006
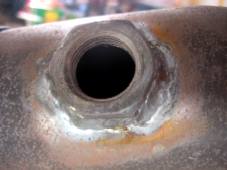
Well I got the threaded collar welded to the side of the exhaust system OK (thanks to Ashley and his TIG welding skills), and threaded in the nice new O2 sensor. All was looking good, as you can see:

Then, I hooked up my spiffy-looking AFR meter, and... (drum roll)... NOTHING. Nada, zip, zilch — except a perpetual 'rich' reading from the AFR meter, that is. So after another hour or so of mucking around, checking connections, etc. and then finally testing out the O2 sensor, at last I twigged to what was wrong. Which is simply that the O2 sensor is located too far from the header pipes to get heated up to operational temperature.
These critters, you see, need to get nice and toasty hot (like at least 250°C) before they will choof out their oscillating voltage for the vehicle's computer (or in this case, my AFR meter) to read. So what I need is an O2 sensor with a built-in heater, ie. a 3-wire sensor, and not the humble single-wire unit I obtained. It's all so obvious when I think about it now... :-/
So, now I need to try and sell my next-to-new single-wire sensor on eBay, and then set about buying a 3-wire jobbie. Hmm, I'm not getting out of this as cheaply as I first imagined... but I am learning a lot. Experience might not be the cheapest tutor, but mate it's effective!
Update: July 28 2006
EUREKA! At last, the AFR meter is WORKING! The new three-wire O2 sensor (ie. one with a built-in heater coil to help get the thing up to working temp.) arrived the other day, and then I found some time this arvo to make up a kind of 'wiring loom' to house all the wiring neatly. Don't want to get all tangled up in it while on the move, do we.

Then it was time to hook it all up... screwed the O2 sensor into the exhaust system, plugged it all in, and put the meter itself underneath the clear top of my tank bag. Once up to heat, the magic numbers appeared on the digital display...

And then it was off to see what happens when you wrap the throttle on, roll it off, hold the machine in third gear at over 5000rpm (which is approx. when the main jets kick in), etc. Naturally, one must be careful not to run up the back of trucks etc. whilst gazing at the AFR meter display.
And as you can see from the water droplets on the tank bag in the above photo, it just had to start raining when I took her for the first test run, didn't it. ;-)
So do I think I will have to do any jetting changes? Well, around town the jetting seems to me to be OK, maybe even a touch on the rich side. But when it comes to full throttle and the rest of it, I dunno... I really need to go on some long runs, put the old girl under full throttle on a few long straights, etc. to get a better feel of what's going on.
My wife asked, "So, is all this AFR gear going to solve any problems?"
"Err, no dear," I said, "but it might reveal some problems... which I shall then set about solving."
"Thought so!" she said with a grin.
* * * * *
A few VITAL links re. jetting, carbies, and other mysteries:
 — the best little jetting how-to in Texas. Or anywhere else, for that matter. Marc Salvisberg (in a magnificent act of unselfishness) shares with us all the fundamental theory and practice for getting your CV carbies jetted PROPERLY.
 — psssst... wanna good run-down on how to work on GSX-R carbies? This thread at www.gixer.com is an excellent and comprehensive article by a few blokes who know their stuff. Lots of great, clear photos along the way — you can't go wrong!
 — the GSResources Garage, excellent articles here. More to the point, do you have a set of Mikuni VM carbies on an older machine? Download this online manual (PDF format) from the Garage and follow its crystal-clear directions to get your carbies clean and correctly set up.
* * * * *
